Sunday, 18 May 2025

Review: Kato 10-1999 and Kato 10-2000 Yakumo Limited Express

This isn't just a new release from Kato, but a new train on Japanese Railways. Released in March, 2025, Kato have produced two versions, a 4-car starter pack (20,350 Yen) and an 8-car special edition (38,500 Yen) in a slip case.

Background

The 273-series 'Yakumo' is one of JRWest's newest trains. Operating between Okayama (on the San'in Main Line) and Izumo (on the Hakubi Line) the route passes through numerous towns as well as famously beautiful scenery. However, earlier generations of rolling stock had a reputation for being a bit shaky and uncomfortable. So, the new 'Yakumo' trains were designed, therefore, to be much more smooth as well as fast. The big, comfy seats can be rotated so that they can either be airplane-style or face-to-face for groups traveling together, and the bathrooms are spacious enough for people in wheelchairs to use easily.

Mechanically, these are tilting trains (something the Kato model replicates) with a maximum speed of 120 km/h (about 75 mph) that operate on 1500V DC. Their livery is unique, a sort of coppery-brown with cream around the windows and a distinctive white cloud design on the sides and cab ends that represents the 'Yakumo' branding.

Kato Class 273-series 'Yakumo' (10-1999)

What's in the box?

  • One powered car and three unpowered cars
  • Accessory pack including replacement one pair of folding doors and a single gangway piece
  • Sticker sheet including destination signs
  • Class 273 information booklet
  • Instruction leaflet


Described as the Starter Pack version of the train, at 
20,350 Yen this is also the cheaper of the two 'Yakumo' trains produced by Kato. It is presented in the cardboard box and expanded polystyrene tray as their other budget offerings, such as the freight car starter pack and the old-style passenger train pack. So, it's easy to store this train pack alongside those on the same shelf.

The cars need to be pushed together on the rail for the couplers to engage with a 'click'. Once that's done off the train goes! Performance is excellent thanks to its slot-less motor, pretty much what you'd expect from any modern Kato train. Cab-end lights come on with minimal current and stay uniformly bright as the train accelerates smoothly.

Externally, the models match our expectations from Kato. The paintwork and printing is excellent, though there has been some discussion as to how effectively the paint on the model matches the glossy, even metallic, finish seen on the real trains. I'm on the fence on this one. When we're looking at model trains on a layout, every 30 cm we stand away from the model is 45 m in the real world, and colours look different as distance increases.

Otherwise, these are nice trains. As is often the case with Kato trains, there are a couple of upgrades available using optional parts available from the usual suppliers. For a start, there's the addition of interior lighting, for which Kato recommend the 'warm white' lighting kits. You'll need at least four of the single-piece pack (#11-213) for a four-car set, although the 6-piece pack (#11-214) is better value if you can use the two spare lighting kits on other trains.

The other upgrade uses #28-220 to replace the lighting boards for the headlights at the cab ends. On the real trains, when two units are coupled together, the headlights of the two cabs that face each other stay illuminated, regardless of speed or direction of travel. This is a safety feature apparently, lighting up the area around the platform where the streamlined cab ends create a gap where somebody could fall into. I've not tried out this upgrade, but there's a nice overview on another blog, here.

According to the instruction leaflet, the set can be made DCC-compatible using #29-351 for the motor, #29-352 for the head/tail lights, and #29-353 for the interior lighting (if installed). These are replacement circuit boards for the analogue boards already fitted.

Kato Class 273-series 'Yakumo' (10-2000)

What's in the box?

  • One powered car and seven unpowered cars
  • Accessory pack including replacement two pairs of folding doors and a two gangway piece
  • Sticker sheet including destination signs
  • Some sort of screwdriver-like tool, perhaps for switching on/off the headlights
  • Class 273 information booklet
  • Instruction leaflet

Although basically similar to the 4-car Starter Pack, I found the 8-car train a bit more problematic. Livery and performance are the same, but the lack of English-language instructions caused some initial frustration!

For a start, two of the cab units have non-working couplings. These look like small, grey, L-shaped pieces of plastic. They (and the grey pockets they clip into) can be removed and replaced with standard couplings and pockets, but since the 'Yakumo' only operates as 4-, 8-, and 12-car trains, there's no real point to doing so: just make sure these driving cars are at the ends of your train.

The other two cab units are the ones with working couplings seating in black pockets. However, as supplied the coupling is recessed slightly so its doesn't flop about when used as 'dummy' couplings at the end of a 4-car train. So, you need to slide the pocket forwards to release the coupling, which now becomes longer and much more flexible. If you don't do this, the trains will couple up just fine, but as soon as the train hits a curve it'll derail because the couplings don't move.

Apparently, this approach is not uncommon on Kato trains, but I'd not come across it before. Well, 'today I learned', as they say!

Once this hurdle had been overcome, I still found the train derailing, though this time only at one particular spot. It turned out that one of the snowploughs kept catching on a piece of rail. In fairness, this was at a joint between two boards, so the railhead might well have been fractionally out of line. But none of the snowploughs on the other 'Yakumo' units caught themselves here. Odd.

There may be an issue with the moulding of these pieces, as similar observations have been commented on, here and here. As it happens, the fix was easy. The bogie unclips and that allows the snowplough to be detached easily. A few strokes with a file reduced the thickness of the snowplough, and when it was put back into place and the train reassembled, it ran flawlessly.

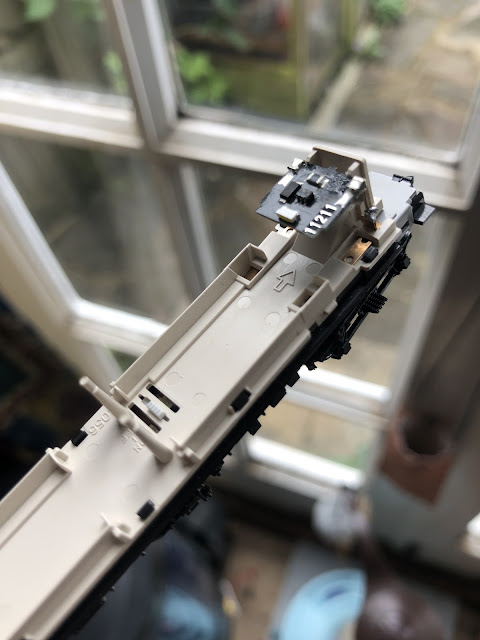
The photo below shows the underside of one of these cars: the coupler can be seen as well as the wedge-shaped snowplough and the headlight switch.

Unlike the 4-car pack, the 8-car pack only includes two driving cars with through doors (or, at least, the open doors and gangways needed to replicate them). The other two driving cars cannot be adapted in this way, and furthermore, are fitted with non-functional (but more prototypical) couplings. This means that these two driving cars must always be at the ends of the train, whether it's being operated as a 4-, 8-, or 12-car unit. So, if you choose to combined this train pack with #10-1999 to create a 12-car unit, the four cars from #10-1999 need to be sandwiched in between the two 4-car units in #10-2000.


Fitting the gangways isn't too difficult but the replacement doors are very thin and easily snapped -- please don't ask me how I know! You start by removing the body shell from the chassis, then gently sliding out the cab detailing part. The piece of plastic that forms the sealed doors unclips and falls out the front, revealing a space into which the corridor connection clips. The whole process takes 5-10 minutes, and as you can see from the picture above, looks quite good despite the inevitable gap between the two cars.

 Conclusion

Despite one or two mishaps along the way, once the couplers were sorted and the snowplough fixed, the train ran beautifully.

Detailing is mostly moulded, as is typical with Kato, but there are some separately fitted details worth noting beyond the doors and gangways already mentioned, such as the pantographs. There are no fewer than four of these on each 4-car unit! All can be raised and lowered as needed. As far as I can tell, only two are normally used on the real things at any one time.

There's a Kato Sound Card for the 'Yakumo' train that includes a number of authentic sounds to add to your driving experience. The card has both controller priority mode and sound synchronisation modes. In controller priority mode, you drive the train as normal, and the Sound Box reacts to things like curves and gradients automatically, for example, by having the motors 'whine' more as they work harder. In sound synchronisation mode the train speeds up and slows down more realistically, and the Sound Box plays the appropriate sounds (such as brakes and motors) as it does so. There are three horns available, one of which has a nifty Doppler effect which works nicely when the train is zipping past you.


Sunday, 27 April 2025

Review: Kato 10-1764 KuMoHa 52 Iida Line train

Kato currently produce two different versions of the KuMoHa 52 series: the first batch (#10-1764) and the second batch (#10-1765). While similar at first glance, the most obvious differences include the windows (smaller on the first batch) and the air vents on the roof (circular on the first batch and a mix of circular and rectangular ones on the second batch). This review looks at #10-1764, the first batch trains.

Background

Built in 1936 and 1937, the KuMoHa 52 series was initially used for fast passenger services around bit cities, particularly Osaka. The first two batches had streamlined front ends that very much reflected the sensibilities of the time. However, with a maximum speed of 95 km/h the streamlining didn't really offer any practical benefits, and a third batch of trains was built with conventional front ends. Inside the trains sported wooden panelling, electric lighting, limited overhead luggage storage, and nicely upholstered seats.

Kato are modelling the trains as they were seen on the Iida Line between 1957 and 1983. This 1500V DC line runs for about 121 miles, much of it single track, and is famous for its attractive scenery and seemingly deserted stations.

Kato KuMoHa 52 (10-1764)

What's in the box?

  • Powered driving car and three non-powered cars
  • Jumper cables on plastic sprues
  • Iida Line booklet

The first thing that grabs your attention is the livery. The combination of blue and cream works really well. It is neatly applied with sharp edges where the two colours meet. Apart from the pantographs, there are no separately fitted details; handrails, etc., are all moulded. Each of the driving cars features one large headlight on the roof and two small red tail lights below the front windows. Removing the body reveals a switch that allows you to switch off the lights if you want to (useful for driving cars in the middle of 8- or 12-car formations).

All the cars are equipped with couplers based on the 'old national' type of coupling used on the Japanese multiple units. These are slightly fiddly to use: they click together just fine, but pulling them apart can require an alarming amount of force.

 is as expected for a modern Kato train. The slotless motor and brass flywheel ensure a smooth, steady response to the controller. Maximum speed is considerably above that seen on the real things, and a slightly lower gearing would have been better. But with that said, the trains move smoothly at low voltages, so this isn't a major problem.

As is usual with Kato coaches and multiple units, you can add internal lighting if you want to but it doesn't come supplied as standard. All the bogies have electrical pick-up, the wheels having pin-point axles that press onto copper contacts.

Like the coaches in the 4-car pack from Kato, this train comes with non-prototypical disc wheels rather than spoked wheels. If you want to replace them with authentic spoked wheels, the ones with 13.2 mm axles are the ones required for these older units. As far as I can tell, you can only replace the un-driven wheels on the trailing cars, not the driven wheels on the power car.

Also included in the box is a leaflet about the Iida Line and the Unitrack assortment produced to replicate it. If you have 210 x 110 cm available, it looks a lot of fun!

The train is presented in a foam-lined slip case for easy storage. A bit larger than a paperback book, this is easily stored on a bookshelf and should keep your train safe when out of use.

Conclusion

This a lovely 'old timer' sort of train that will surely grace many layouts. On the plus side, the paintwork is attractive and the moulded detail nice and sharp. Quibbles about maximum speed aside, the train moves quietly and smoothly across the power range thanks to a well-built mechanism.

The two main negatives are more about what's not included but available as upgrades: the spoked wheels and the internal lighting. I'm on the fence about the couplings. They seem to work well but don't look especially durable.

Definitely worth mentioning is the existence of a Sound Card for this type of train. This adds some excitement to driving the train, but doesn't, perhaps, offset the lack of a DCC slot or easy DCC upgrade.

RRP is 19,030 Yen, around £100, which feels like good value for a four-car train.

Sunday, 22 December 2024

Review: Kato 2021 C11 steam locomotive

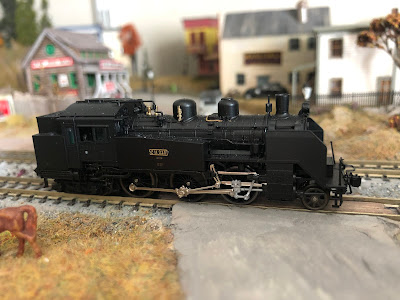
The C11 steam locomotive has been part of the Kato range for a long time, the first model produced in 1971. It remained part of the Kato range for more than 40 years, incrementally improved in minor ways but notably over-scale. In 2021, Kato released a completely new model that was properly to scale and also featured a coreless motor and much more fine detailing. It appears to represent the third tranche of C11s built between 1940 and 1941, but as they ran during the 1960s -- most obviously, with the addition of the electric LP42 headlight on the front.

Background

These JNR locomotives have a two-cylinder, 2-6-4T wheel arrangement and Walschaerts valve gear. No fewer than 381 examples of the class were produced between 1932 and 1947, albeit across four different generations. They were designed for use on suburban and branch lines, but were eventually seen all over Japan. Typical jobs included local passenger trains and short distance freight trains, but they occasionally worked limited express and even sleeper trains. As time passed and passenger work was taken over by railcars of various sorts, the C11s took on more freight work and even operated as shunting locomotives. By the 1960s even this sort of work was being handled by diesel and electric locomotives and mass withdrawals began, but some remained in service until 1975. Six have been preserved in working order, and more than 50 can be found as static exhibits around the country.

Kato ED75-1000 (3075-4)

What's in the box?

  • C11 locomotive with working head and tail lamps
  • Metallic-effect number plates (four different locos)
  • Dummy couplers
  • Rapido couplers
  • Kato knuckle couplers

With the exception of their recent foray into 00-9 narrow gauge models, Kato's steam locomotives are not much seen outside Japan and the US. That's a bit of shame if this model is anything to go by, because it's really nice. It runs very well, apparently down to 216-mm radius curves, and mine certainly handles 282-mm radius curves without any fuss at all. It's a decent hauler too, pulling at least four carriages without any sign of slipping.

Detailing is good. There's a mix of moulded and separately fitted details including handrails and pipes of all sorts. The cab includes glazed windows and even details on the outside that can be seen when the model is held up to the light. Headlamps are fitted to both ends of the loco, and these light up in the direction of travel. 

While the model features a lot of attractive detail, this comes as a mix of plastic and brass separately fitted parts. The brass parts look excellent, but the plastic parts, like the upright poles on the front platform, are easily bent out of shape. Similarly, while having the option of different numbers makes it easy to have multiple examples of the class on your layout without duplication, the brass-effect plastic pieces are fiddly to apply and the paint seems to chip off easily. Installing them is a little bit of a faff, since you need to cut them off a sprue and then push them into a moulded recess on the model. Masking tape is one way to hold the pieces without then flying off onto the carpet, but there's a risk the tape will pull off some of the paint.

The valve gear works well, but again, the mix of metal with plastic parts isn't ideal. The colours don't quite match. From normal viewing distances the differences in colour aren't obvious, and a bit of weathering might help. But still, it's a bit annoying.

Performance is as you'd expect from any modern Kato locomotive: smooth and quiet, albeit with an unrealistically high top speed (the real locos were limited to 85 km/h). On clean track the loco will crawl along fairly well but of course the short wheelbase does make them sensitive to 'dead spots' on the track.

Conclusion

Although this is one of the smallest steam locomotives that Kato produce, at 12,100 Yen (just over £60) it still represents quite good value. The model runs as well as it looks, and even if the livery is a bit dull, the type had a very long working life and could be found doing all sorts of work almost anywhere in the country. Some remain in use even today, working special services (called SL trains) such as the SL Fuyu no Shitsugengo (Steam Locomotive Winter Wetlands) service in Hokkaido.

Incidentally, the C11 is one of the locomotives for which Kato produce a Sound Card. It's a lot of fun!


Monday, 16 December 2024

Review: Kato Diorama Mini Circus wagons

Late in November, I was at the Warners model railway exhibition at the Birmingham NEC helping out on the Kato stand. That was fun, if exhausting! As well as showcasing the Mini Diorama Circus, the new EC-1 controller was on the stand for visitors to try out. Based on the real controls of a Japanese multiple unit, this is an expensive but very fun piece of kit that works nicely with the Sound Box to deliver a more immersive driving experience.

Commemorating the Mini Diorama Circus were these wagons, sold as pre-coloured kits for £10 a piece. Using a Japanese insulated goods van as their basis, the colourful liveries (designed by Akiko Takasaki) are, of course, fictitious.

Background

These appear to be based on the RE 12000 insulated wagon that were in use on JNR between 1954 and 1986. Ice was placed in compartments on the roof, and the cold air produced would keep the contents of the van nice and fresh.

Maximum speed was 75 km/h.

Kato 'Mini Diorama Circus' versions

The Kato model is normally supplied ready-to-run. One version is supplied in the Kato 10-033 freight car pack, described elsewhere. On the roof, the hatches for placing ice can be seen, while a ladder is moulded on one end of the body that presumably gave access to these hatches when fresh ice needed to be added. But the three models reviewed here are supplied as kits, and as far as I know, only at Kato Mini Diorama Circus events.

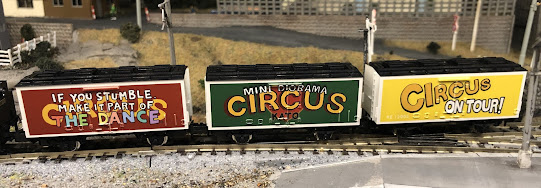
There are three versions, which for the sake of simplicity I will call the 'red', 'green', and 'yellow' wagons. All are assembled in the same way. First, the wheels are clipped into the chassis, and then the metal weight placed onto a slot on the top of the chassis. The chassis includes built-in Rapido couplings. The painted body work is actually a sort of sleeve that slides onto a rectangular core that includes the roof. Once these two pieces are pushed together, they are clipped onto the chassis which secures the metal weight in place.

As should be clear, the wagons are essentially identical except for the coloured sleeve that features the bodyside details as well as the paintwork. Needless to say, there are no separately fitted details of any sort.


The 'red' wagon sports different affirmations on each side, encouraging modellers to enjoy their dioramas. Foxes are a bit of theme in the publications that go with the Mini Diorama Circus, in part because in Japanese mythology they are able to do magic, including being able to turn into humans. In the Kato literature, some of these foxes (and badgers) enjoy making Mini Dioramas!


The 'green' wagon has the Kato branding on one side, and an 'art is love' affirmation on the other. Finally, the 'yellow' van is the most eye-catching of the three, I think, with a simple statement on one side and a picture of a ticket on the other. If you look closely, you can see that the ticket is 'priceless' and dated to 2025.

Performance is up to the usual Kato standards, but relevant to modellers building Mini Circus Dioramas, these wagons handle 15-cm radius curves just fine. A nice touch is that all three sport Re 12xxx numbers, as befitting JNR wagons: 12001 is the green van, 12002 the yellow one, and 12003 the red van.

Conclusion

These models sold well on the day, with a lot of people clearly buying them as fun mementoes of their day trip to Birmingham. For sure, if you were buying plain vanilla Re 12000 vans from Japan, they'd cost half as much as these -- but these Mini Circus Diorama models are much more attractive models.

But what strikes me about these models is how easily they could be used to make a 'real' circus train. Weathered a bit, and then run alongside cattle trucks for the livestock and a couple of coaches for the performers, they'd be as useful on a British or American layout as a Japanese one. Sure, for a British layout you'd want to add some turned brass buffers, but that's about it.

I'm not sure how widely available these models will be. But definitely worth looking out for if you visit an event where Kato are exhibiting their Mini Circus Diorama.


Sunday, 6 October 2024

Review: Kato 10-1345 KuMoHa 11 200 Nambu Branch Line 2-Car Set

This model was bought with a specific project in mind. Not having the space for anything serious, I thought about creating a Japanese-style layout on a circular piece of wood I'd come across in a charity shop. What I needed was a quaint railcar or EMU to run on it, something happy to go around a circle of track just 30 cm in diameter. Although not the most colourful train that Kato produce, this unit does the job and has some nice details and an old-fashioned look that make it a charming addition to the fleet.

Background

Built at various points during the late 1920s, these sets were ordered by the Ministry of Railways to replace older wooden-bodied units (the DeHa 63100 series). Although those units had worked well, building wooden bodies had become expensive after an earthquake increased demand for timber, and on top of that, wooden bodied cars didn't provide much protection for passengers during collisions.

The new railcars used standardised underframes and bogies. Steel plates were attached to the frame of the body using rivets, while additional strips of steel reinforced the plating around the windows. Additional ventilation was added to the roof, while curtains were added to the windows instead of shutters.

Maximum speed was 95 km/h. Seating was third-class throughout.

Kato 10-1345 KuMoHa 11 200-series


    What's in the box?

    • One powered car with pantograph and one unpowered trailer car
    • Working headlights and taillights
    • Sprue with assorted plastic parts such as cables and ATS gear
    • Sticker sheet including train numbers and destination headcodes suitable for the Nambu branch and main lines, the Tsurumi line and the Ome line
    On the one hand, the colour scheme isn't the most exciting. The seating inside the cars is plain off-white plastic looks very plain. As per the prototype, the seating runs longitudinally along the car, and other than these 'benches' there's really not much to see inside the cars. On the real things, the upholstery is blue, so painting them is certainly one possible upgrade. Adding some seated passengers, and a driver in the cab, would also make a big difference.

    But on the other hand, the models themselves are cleverly designed and include some excellent features. Starting with the underframe detailing, there's a lot to see here, including all sorts of pipes and rods. The wheels are spoked and look very nice indeed.

    The couplings are used are not Rapido couplings but adaptations of the classic Japanese Shibata coupler. These work well, but you can't easily join them together on very tight curves (such as 15 cm radius Unitrack). I ended up replacing them with home-made neodymium magnet couplers that do the job nicely on circular layouts. That aside, what's really impressive about the couplers is the 'kinematic' hinge they're attached to on the body, rather than the bogies. This clever device allows the couplings to swing freely, while being gently centring, keeping the cars quite close together even on tight bends.

    Inside the power car there's a motor with two flywheels, connected via cardan shafts to both bogies. Electrical pick-up is via the pin-point bearings on all eight wheels of the power car. There are no traction tyres, but haulage is more than adequate for the two cars in the unit and a couple more unpowered cars if you wanted to add them (Kato #10-1347, Tsurumi Line 2-Car Extension Set).


    On both cars, the body unclips to reveal a couple of extra goodies. One is a small switch for turning on and off the headlights and taillights. This is useful when coupling together two sets to make a four-car train: the lights on the inward-facing cabs would not normally be in use, so shouldn't really light up when the train is running.

    The other useful fixture are the standard Kato lighting kit attachment slots. As always with installing these kits, the instructions are somewhat generalised so a certain amount of fettling may be required, but once installed, the results are worthwhile.

    Conclusion


      As the video above hopefully shows, this is a decent model that works astonishingly well even on ridiculously tight curves. The motor isn't quite as silent as some of the more recent ones used by Kato, but the noise it makes isn't obtrusive by any means.

       While the styling and livery might best be described as workmanlike, as an 'old time' model this is a useful little train for suburban branchlines set anywhere between the 1920s and 1970s.

      Sunday, 22 September 2024

      Review: Kato Roundhouse 10-913 485-Series 'Kirishima - Hyuga Type'

      Bit of a labour of love this one. While picked up inexpensively as a secondhand model, the sellers description that it 'ran' was only true in the loosest sense of the word. With only a single bogie working, and even that one growling and offering insufficient traction, the train just about crawled along, and needed occasional nudges to keep going. But after a few false starts, the model was fixed and now runs quite well.

      Background

      For me, this is an example of one of the most characteristic Japanese electric trains. Built between 1964 and 1979 across several different series, the type lasted in regular service until 2017. A few soldiered on on special services until 2022. They were intended to work on both AC and DC routes at up to 120 km/h, though the type could apparently reach speeds of up to 160 km/h safely.

      The design was based on the earlier 151-series, and the earlier 485-series trains had similar front ends including the long, streamlined nose. From 1972 onwards, they were instead built with more flattened front ends that made it easier to couple two units together to form a single train. One distinctive feature of the type is the illuminated headboard panel at the nose, which in typical Japanese style has both the name of the train and some sort of colourful artistic flourish.

      Inside, the trains were equipped to provide a comfortable environment in both hot and cold weather. The standard train comprised 11 cars including two first class cars and a dining car.

      This particular model, however, is of a three-car variant as it operated between 2000 and 2011 on as the Kirishima & Hyuga limited express between Miyazaki and Kagoshima in the Miyazaki Prefecture on the southern tip of Kyushu.

      Kato 10-913 485-Series 'Kirishima - Hyuga Type'


         What's in the box?

        • Two Kuha cab cars with working headlights, taillights, and illuminated headcode
        • One powered Moha car with pantograph
        The model didn't come with any extra parts. The instructions are printed on the back of the box. One cool feature though is that the illuminated headboard can be rotated using a very small flat-head screwdriver inserted into a small hole under the nose. The model can also be upgraded for internal lighting using the Kato 11-201 kits. 

        Although the model is equipped with headlights, taillights, and the backlit headboard, these are barely visible until the train is running at close to full speed. That's a bit disappointing since they add a lot of character to this sort of train.

        Getting the thing running properly again!

          As it came, the model barely ran and one of the couplings was broken.

          Replacing the broken coupling, at least, was easy. A set of Kato 11-705 Type B Black Couplers was bought from TrainTrax and arrived within a couple of days. The broken one was pulled out, and after assembly, a new one pushed into the receptacle. So far, so good!


          Getting the model running properly was more of a problem. One problem was a missing cardan shaft between the motor and one of the bogies. The motorised unit drives both bogies, and each bogie is connected to the motor via a green cardan shaft that has a similar sort of fitting at each end. The bogies pop out easily if pulled and twisted slightly, and presumably at some point in its life, the owner of this model had done that and lost one of the cardan shafts.


          So, after rooting about the Kato website, I managed to find the cardan shafts used on the current 485-series models. I ordered a pack, and again, TrainTrax delivered them in a couple of days. But alas, they were not the right sort, as you can see in the picture above.

          After a couple of emails to Kato, one of their engineers offered a solution! This particular model has been out of production for a while, and spare parts aren't available. But a different sort of bogie, ASSY #41912ZD1, would fit the model and had the right sort of cardan shaft. The engineer was absolutely right, and after receiving these from Kato, I popped them into the train and put it on the tracks. Off it went!

          The story isn't over yet, though. While the motorised car now ran beautifully, the replacement bogies were designed for a different sort of train. The couplings were set back so far that it couldn't connect up to the two unpowered cars. Or rather, they'd connect on a straight, but as soon as the train hit a curve, it would derail.

          With the couplings pulled out from their clip fitting, and then pushed in only a little bit, they could be glued to about the right length. Superglue did the job, and once dried, the bogies were put back into the train and tested. All went well! 

          While the bogies aren't the same colour as the originals, that can be easily fixed with some black paint. The main thing is that the model runs and brings a delightful splash of colour to the layout.

          Conclusion


            Operation is pretty good. Overall, the model runs smoothly, if not quite as quietly as the latest Kato trains. The motorised car seems to have no problems hauling the two unpowered cars. As mentioned above, the lighting is lacklustre, but otherwise this is an attractive train well worth the effort it took to get up and running.


            Saturday, 7 September 2024

            Review: Kato Koki 10000 and Kokifu 10000

            Like the six-car freight pack with its basic container flat, these two models lack the finer details seen on Kato's higher-end models. On the other hand, they are definitely priced to sell, and with a bit of weathering, make good models for running behind a wide range of electric and diesel locomotives.

            Background

            The 10000-series container wagons were built between 1966 and 1969. They were designed to run at higher speeds (up to 100 km/h) than earlier designs. At one end is a small platform for an operator to stand on when using the hand brake.

            Like other container wagons of the era, they were designed for the JNR standard 10' container. Some were modified to carry two 20' containers (the 11000 and 12000 series) instead of the 10' containers. These modified wagons could not carry 10' wagons. There were some other variants produced over the years, including one series (the 18000 series) built in 1968 for use in the cold climate of Hokkaido.

            Perhaps the most unusual variant was the Kokifu wagons. With freight trains being accelerated to 100 km/h, suitable accommodation for the guard, or conductor, became an issue. Existing brake vans (cabooses) could not run at that speed, so instead a number of container wagons were built with a small conductors compartment. These wagons could now only carry four 10' wagons rather than five.

            Both the Koki and Kokifu wagons were in widespread use across the network through the 1970s and 80s. The last were removed from service in 1996.

            Kato 8002 Container Wagon


             What's in the box?

            • Koki 10000 container wagon
            • Non-removable containers
            The wagon is nicely moulded and presented in JNR freight blue. The lettering is simple but effective. The wagon itself is solid, with only basic detail represented underneath the solebar and nothing much on the top. There is a metal weight on the top of the wagon, with all five containers represented by a single-piece that clips into the place. The metal weight seems a bit loose, so I used a drop of glue to fix it into position.

            As supplied, the container moulding works, just about, but the gap between each container isn't completely convincing. Weathering makes a huge difference, giving you a reason to run some dark, watered-down paint into those gaps. This makes the gaps look more like shadows. It's also worth painting the metal weight while you have the container removed for weathering. The weigh is easily visible from the side, and if you paint it black, it won't be nearly as intrusive.

            Kato 8003 Container Wagon with guard's compartment

            What's in the box?

            • Kokifu 10000 container wagon
            • Non-removable containers

            Basic specification much like the Koki 10000 wagon, but with the distinctive caboose, or conductor's compartment, at one end. Again, judicious weathering will really help make the single-piece container moulding more realistic.

            On the plus side, this is a quirky prototype that adds interest to any container train. But on the other hand, the low-end specification mean the model isn't as good as it might be. There are no working taillights at the back of caboose, and neither is it possible to add the Kato lighting kit to illuminate the inside of the guards compartment.

            Summary 

            The Koki container wagon has an RRP of 770 Yen (about £4.25 at the time of writing) while the Kokifu one with the caboose is slightly more expensive at 825 Yen (about £4.50). In either case, that's pretty impressive value as the models run well, look nice, and represent a useful, long-lived prototype.

            Of course, they're compromised in significant ways. The container loads aren't removable, so you can't swap the supplied containers with different ones to add variety to your trains. Equally, as you can't remove the containers, you can't run an 'empty' train, and even if you could, the wagon frame isn't open and lacks the details such as pipes you'd expect to see on a modern-spec model.

            Review: Kato 10-1999 and Kato 10-2000 Yakumo Limited Express

            This isn't just a new release from Kato, but a new train on Japanese Railways. Released in March, 2025, Kato have produced two versions,...